The amount of money I have spent on personalized, monogrammed gifts for friends (or splurges for myself) is a little ridiculous, but I always justify it in the name of cuteness or necessity. The other day, I started thinking about how easy it would be just to do it myself! So, I looked into the project, and it turns out it is a ton easier than I expected it to be.
I always use Adobe Photoshop for my blog graphics, but definitely realize that the majority of people either a) don't know how to use this program or b) don't have it. However, this is no problem because the only thing necessary to design your own graphic with a monogram is Microsoft PowerPoint! (Shocking, right?)
So, here are my step-by-step instructions to make your own monogram!
Step 1// Download the font. I use the Monogram KK font found here. Click the download button, and then you'll have to click on the .ttf file to add it to your font collection. This is definitely not the only option in terms of font choices, but if you're a fan of the scripted monogram this is definitely a good option! Times New Roman is a great option for a classic monogram look.
Step 2// Open Microsoft PowePoint to just a normal, white backgrounded presentation. Delete the default text boxes.
Step 3// Click File --> Page Setup. This will allow you to change the size and orientation of the slide. In my example, I did a 7 x 7 square, but the size possibilities are endless and definitely depend on the purpose of your monogramming needs!
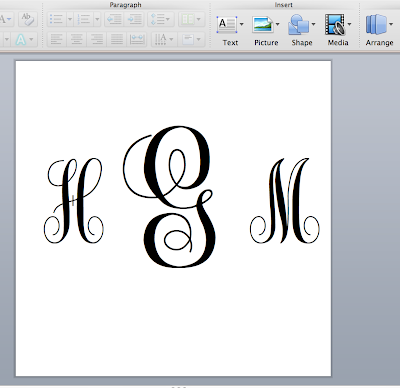
Step 4// Type out your monogram initials into SEPARATE text boxes. The separate text boxes is really important - also - remember to put your last name initial in the middle! I used 150 pt font for each letter.
Step 5// Enlarge your last name initial. It's definitely your call how big to make it, but I chose 250 pt font.
Step 6// Interlock your initials. This is another step that requires personal preference, because you definitely don't have to interlock them at all for it to still turn out cute! To move the letters, move the text box around. You have to click on the outside of the text box to be able to move the letters without the type tool coming up. I love that my version of PowerPoint has an alignment feature to help me make sure that my letters are perfect!
I like mine to interlock a little bit, so mine looks like this.
Step 7// Center your monogram. To do this, hold down the Shift key and select all three text boxes. From there, you can either drag your monogram with your mouse or use the arrow keys to move the group to the center (or wherever on the page you want your monogram) of the page.
Step 8// Adjust the font colors (if you want). You can either change all three initials to a different color, or change your first and middle initial colors while choosing a different color for your last name! Here are two examples:
Step 9// Save or print your monogram. Click File --> Print if you want to go ahead and print the monogram to use as a binder cover, stationery, business card, etc. If you would like to save your monogram as a picture to apply digitally to other sources, then click File --> Save As Pictures.
Obviously, there is a lot of leeway for creativity in terms of placing an image as a background in the slide, font choices, color options, size, etc... but this should get you started!
Happy Monogram Monday!


No comments:
Post a Comment